컴포넌트's Vue,vuex 에서 어떻게 상호 작용을 하는가!?
이 글은 https://dzone.com/articles/how-do-components-interact-in-vue-and-what-is-vuex 를 번역 한 글입니다.
컴포넌트’s Vue,Vuex 에서 어떻게 상호 작용을 하는가!?
라지 스케일에서 컴포넌트간에 데이터를 어떻게 공유하는지 Vue/Vuex 어플리케이션을 만들면서 알아보자.
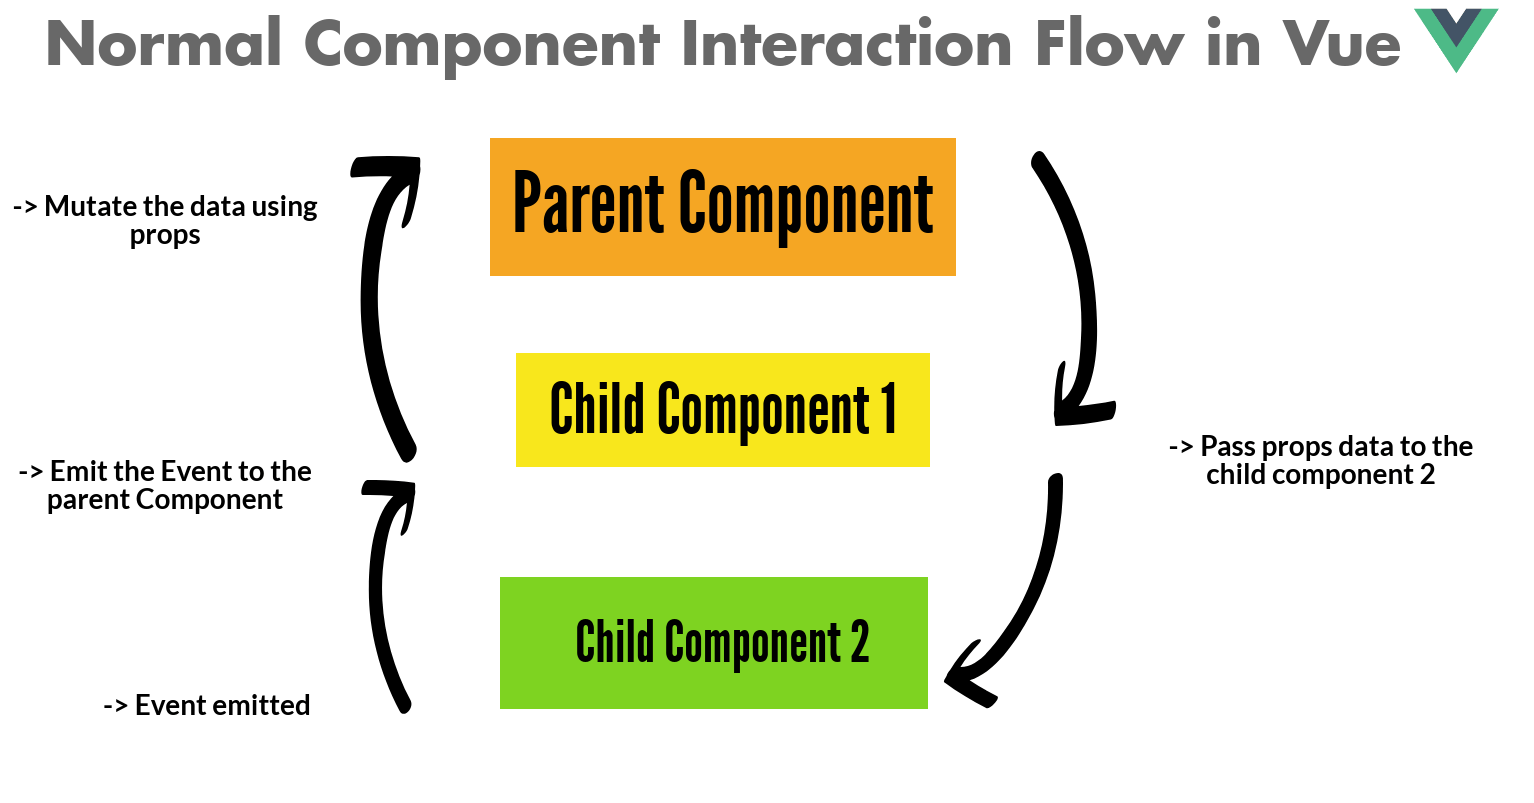
프로그레시브 프레임워크인 Vue 는 Angular 와 비슷한 문법 구조를 가졌다. 첫번째로, Vue에서 컴포넌트가 무엇을 하는지, 어디서 Vuex가 제공되는지 이해하기 위해 아래 그림을 보자. 그리고 Vue가 컴포넌트간에 데이터를 공유하기 위한 기술을 어떻게 제공하는지 알아 볼 것이다.
What Is a Component and Why Do We Need to Share the Data Between Components?
컴포넌트느 무엇이며, 왜 컴포넌트 간에 데이터 공유가 필요한가?
만약 Angular directive에 익숙하다면, 우리 자신의 로직을 작성 하고, 패턴(template)을 제공하고, 루트 인스턴스에 컴포넌트를 등록하는 대신 컴포넌트를 호출 할 수 있는 그저 간단한 directive 와 같다.
예제
// Button directive component

Vue.component('button-directive', {
    data: function() {
        return {
            counterValue: 0
        }
    }
    template: '<span>-Button Counter-</span><button v-on:click="counterValue++">8</button>'
});

<div id="directive">
    <button-directive></button-directive>
</div>
위 예제에서 button-directive는 버튼을 렌더링 하는 템플릿과 버튼 카운터 값을 증가시키는 로직을 가진 컴포넌트이다. 이 컴포넌트는 최상위 레벨에 선언하면, 다른 컴포넌트와 공유 할 수 있다. 더 많은 것이 궁금하면, Vue component 문서에 방문바람.
위의 예제는 하나의 컴포넌트지만, 만약 부모컴포넌트와 자식컴포넌트가 같은 인스턴스를 서로 공유하는게 여러 컴포넌트이면 어떻합니까? 컴포넌트간 공유는 다양한 기술을 사용하여 발생한다.
1. Props and Events
Props 은 자식 컴포넌트에 어느 데이터 타입이든 전달 할 수 있으며, 컴포넌트에서 받는 어느 데이터 종류든 제어 할 수 있다. 그러면 부모 데이터가 변경 되면 자식 컴포넌트가 업데이트 된다. 자세한 내용은 Vue’s props 문서 참조. Events 는 자식 컴포넌트에서 부모 컴포넌트로 업데이트된 정보를 전달 하는 방법 이다. Events 는 자식의 변경점을 부모 컴포넌트에 알리는 방법을 제공한다.
예제
<my-component @eventExample="parentHandler"></my-component>
내 컴포넌트는 어느 변경이든 트리거 하는 eventExample 을 가진 자식 컴포넌트 이다.(내부적으로 v-on:eventExample 사용)
비슷한 방식으로 event 를 실행 할 수 있다.
export default {
    methods: {
        fireEvents() {
            this.$emit('eventExample', eventValueOne)
        }
    }
}
input value가 변경되면 triggerEvent 메소드를 호출하는 양방향 바인딩의 경우 props와 events는 v-model과 함께 사용 할 수 있다.
예제
<template>
    <div>
        <input type="text" :value="value" @input="triggerEvent" />
    </div>
</template>

<script>
    export default {
        props: {
            value: String
        },
        methods: {
            triggerEvent(event) {
                this.$emit('input', event.target.value)
            }
        }
    }
</script>
2. Provide / Inject
조상 컴포넌트에서 모든 자손 컴포넌트의 데이터나 메서드를 선택적으로 표시 할 수 있다. provied/inject 자체는 reactive 하지 않지만 reactive 객체를 전달하는데 사용 될 수 있다.
예제: 두 컴포넌트와 컴포넌트간 공유
const Provider = {
    provied: {
        foo: 'bar'
    },
    template: `<div><slot><slot></div>`
}

const Child = {
    inject: ['foo'],
    template: `<div> injected. <slot><slot></div>`,
}

new Vue({
    el: '#app',
    components: {
        Child, Provider
    }
})
## Where Vuex Comes Into the Picture?
이미지에서 Vuex는 어디서 오나?
위에서 얘기했다싶이, 두개의 컴포넌트사이에서 인스턴스를 공유 할 수 있다; 한 컴포넌트가 두개 도는 세개 그 이상의 컴포넌트에서 공유 되는 경우에 발생한다.
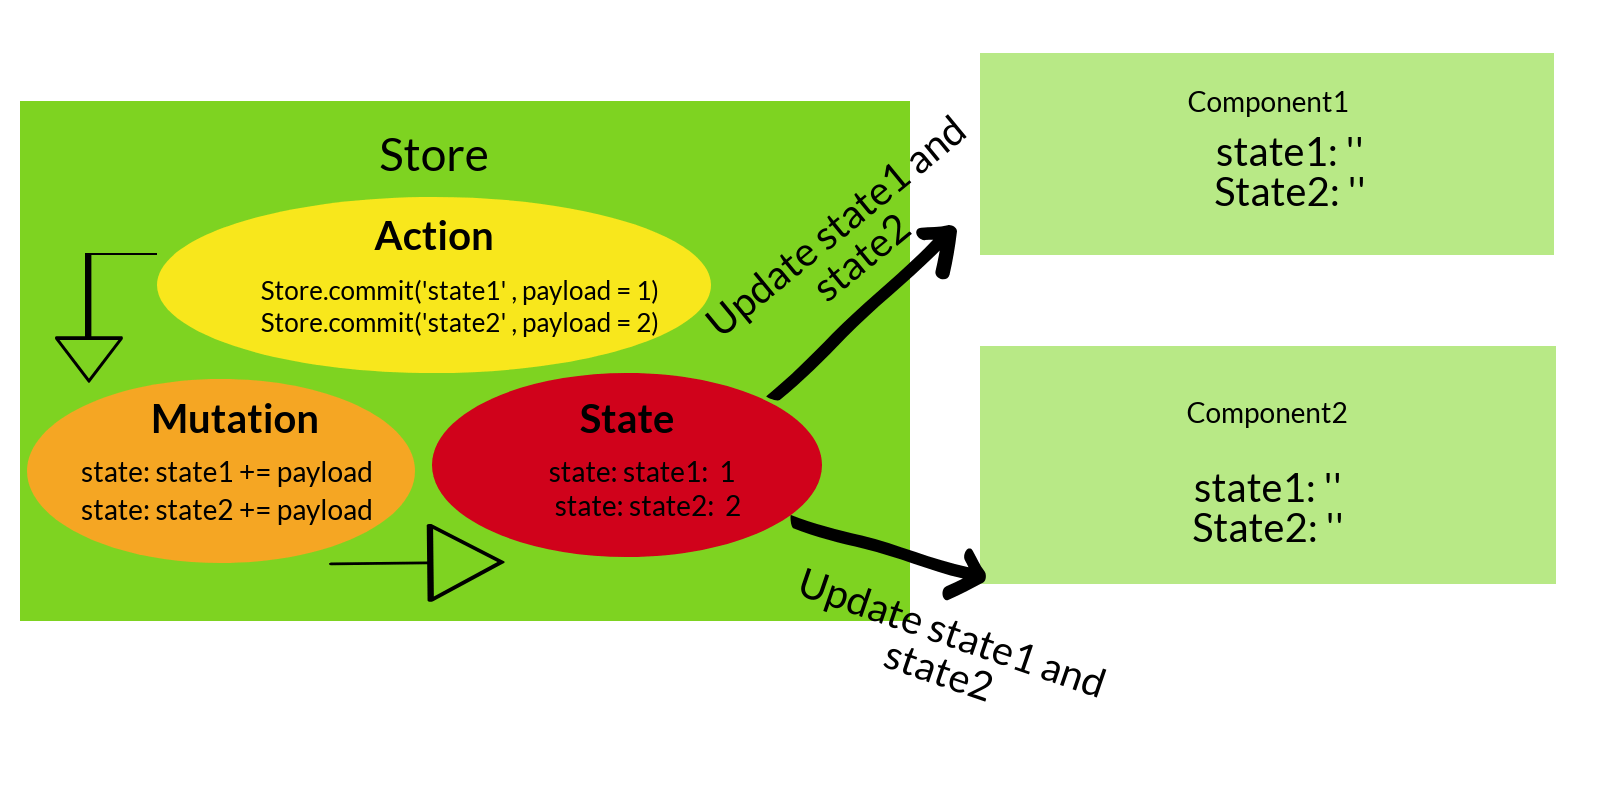
수백개의 컴포넌트가 있는 대규모 어플리케이션이 있고, 50개의 다른 컴포넌트를 공유해야하는 한개의 컴포넌트가 있다고 가정하자. 컴포넌트 상태를 유지하는데 이슈가 있다고 보지 않습니까? 이를 위해 Vuex는 상태를 유지하고 상태의 어느 변경이든 mutation 을 사용하여 처리하고, commit 을 사용하여 mutation 을 호출 할 수 있다.
요약하자면, Vuex는 store 에서 데이터를 읽는 모든 컴포넌트를 reactive 하게 업데이트 한다.
- Actions : 수정할 값을 받아서 상태를 변경 하는 곳
- Mutations : 실제 상태가 변하는 곳
다음 예제를 보시죠.
참고 : store를 초기화 하기 위해 Vues.Store 인스턴스를 만든다.
/* Store where the state is initialized and the values are mutated depending upon the values */
var stateManager = new Vuex.Store {
  state: {
      state1: '', // Initialize the state1
      state2: ''  // Initialize the state2
  }
  actions:{
      // API's can be called here and then accordingly can be passed for mutation
  },
  mutations: {
    changeStateOne(state, payload) {
      state.state1 += payload; // Recieved the payload from the action at the bottom
    },
    changeStateTwo(state, payload) {
      state.state2 += payload; // Recieved the payload from the action at the bottom.
    }
  }
}
// Component one
const componentOne = {
  template: `<div class="componentOne"></div>`,
  computed: {
    stateManagerComponent() {
      return {
          stateManager.state.state1
          stateManager.state.state2
      }
    }
  }
}
// Component Two
const componentTwo = {
    template: `<div class="componentTwo"></div>`,
    computed: {
        stateManagerComponent() {
            return {
                stateManager.state.state1
                stateManager.state.state2
            }
        }
    }
}
new Vue({
    el: '#app-container',
    components: {
        componentOne,
        componentTwo
    }
    methods: {
        increaseStatesValue() {
            stateManager.commit('changeStateOne', 1); // Action with value one that is sent to the store
            stateManager.commit('changeStateTwo', 2); // Action with value two that is sent to the store
        }
    }
})
  // Thus resulting to a shared state between two components.
<div id="app-container">
    <div class="componentOne"></div>
    <div class="componentTwo"></div>
</div>
두 컴포넌트는 같은 state를 공유하며, 컴포넌트가 서로 같은 state를 공유하고, 하나의 단일 store를 통해서 같은 값이 추가 되는 것을 볼 수 있다. (위 에제에서는 stateManager 이다.)
Actions 참고 사항: 위 예제에서, mutation 부분에 있는 changeStateOn() 과 changeStateTwo() 함수는 increaseStateValues() 함수에 payload 를 제공 하는 함수 이다.
위 예제는 아래 다이어그램에 매핑 할 수 있다.
Vuex는 flux 를 사용합니다. flux에 대해 배우고 싶으면, flux pattern을 확인바람.
이 본문을 통해 Vuex가 Vue 응용프로그램에서 사용되는 이유와 두 컴포넌트간에 통신하는 방법을 제공하고, 상태간에 변경이 용이 한지 에 대한 아이디어가 됬으면 좋겠다.